How to install a Wazuh SIEM server on a Raspberry Pi 4B
- Tutorials
- by Jacob Riggs
- 21-11-2021
With many security professionals now working remotely from home, some are looking at ways in which they can improve their home environment network and endpoint security. Commercial SIEM solutions are often considered too costly and complicated to deploy, but free lightweight open-source solutions offering minimal overhead such as Wazuh provide a good compromise for those of modest means aiming to mature the security of their home or small business environment.
This is my walkthrough on how to install the Wazuh server manager onto a Raspberry Pi 4B as an all-in-one deployment. I noticed there was no clear guidance online on how to go about doing this for a Raspberry Pi 4B, only a significant number of online posts outlining the installation and deployment difficulties people have faced. So here I've decided to document the process I took, tested and validated from start to finish, with clear directions anyone can follow.
By following this guide you can run your own open-source SIEM solution on a Raspberry Pi 4B at home. This is great not only for existing security professionals looking to improve the resiliency of their home setup, but also for those new to the information security industry seeking to gain hands-on experience in SIEM deployment, management, and other SIEM/SOC related activities.
Getting started
To get started, I used a Raspberry Pi 4B with 8GB RAM and a 128GB SanDisk Extreme SD card for storage.

Whilst the Raspberry Pi 4B I used for this project was custom built from TurboPi with high-end hardware for this particular purpose, any Raspberry Pi 4B with adequate hardware capable of running Raspbian OS (buster or greater) leveraging the AArch64 64-bit extension of the ARM architecture should be sufficient.
Walkthrough
![]()
- Install a Raspberry Pi 64-bit ARM OS
First download and install the official Raspberry Pi Imager.
Now download the latest Raspi OS ARM64 .zip image from the official repo (make sure it's the latest version).
Open the Raspberry Pi Imager application.
Select the
CHOOSE OSbutton and in the dropdown list select theUse customoption.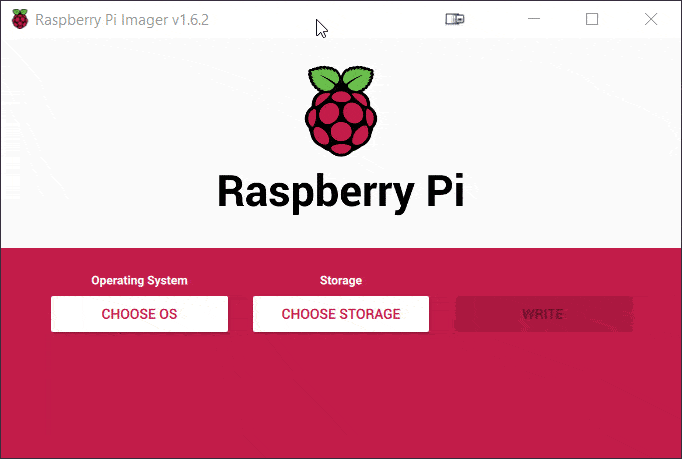
Select the Raspi OS ARM64 .zip file you just downloaded.
Select the SD storage card to write this to.
Proceed with the prompted erasure, formatting, and writing activities to install the OS to your SD card.
The last step here is to write an empty text file named 'ssh' (no file extension) to the root of the directory of the SD card.

When the device boots and sees the 'ssh' file present, it will automatically enable SSH, which will allow us to remotely access the device command line in a headless state.

- Identify your Raspberry Pi local IP address
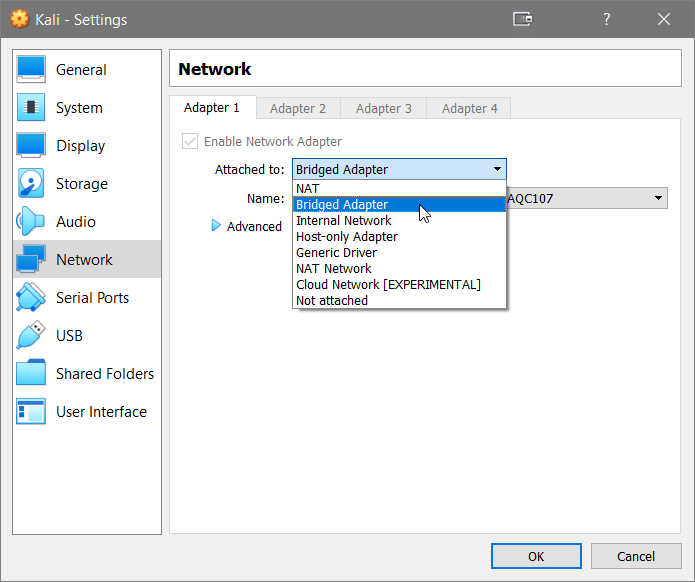
For this I use a Kali VM in VirtualBox, but any flavour of Linux distro can acheive the same.
As the guest VM is not visible to the host under the default VirtualBox NAT settings, you need to change your VM network settings to bridge the network adapter between your host machine and the guest VM.
Once the network adapter is bridged, we need to identify the Raspberry Pi IP address on the network. There are a few ways to do this (such as logging directly into the router), but we can also use an
arpcommand with the-naflag to display the local network address translation tables and pipe the output usinggrepto pull any MAC addresses that begin with identifiers we're interested in.arp -na | grep -i dc:a6:32Raspberry Pi MAC addresses always use the same OUI (Organizational Unique Identifier) in their MAC address (b8:27:eb for all Raspberry Pi devices except Raspberry Pi 4B which uses dc:a6:32).

- Connecting to the Raspberry Pi
Now we have the device IP address (in this example mine is assigned 192.168.1.93), we can SSH into it using default credentials
ssh pi@192.168.1.93with the default password raspberry and get started.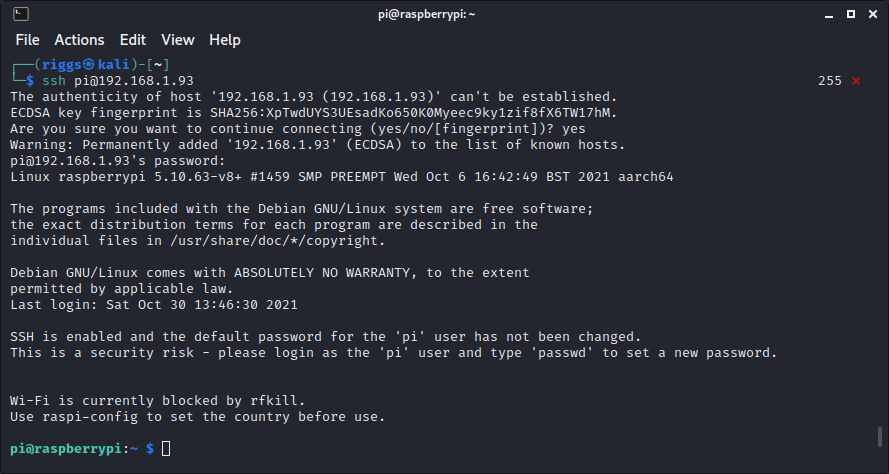
- Change hostname and update
First you may wish to change the hostname from raspberry to wazuh (or something else). To do this run the command
sudo raspi-configand navigate toSystem Options>Hostnameusing the GUI.
Type in your desired hostname and hitEnter, then return to the main menu of the GUI and selectUpdate. Once the device has finished updating, navigate to the toFinishbutton to save your new raspi-config settings.
For the hostname change to take effect, reboot the device using the commandsudo reboot, then SSH back in using the same credentialsssh pi@192.168.1.93with the default password raspberry once the reboot is complete. - Enable login as root
Then if you want to login as root using SSH or WinSCP you need to edit the config of SSHD.
Login, and edit the sshd_config file using
sudo nano /etc/ssh/sshd_config
Find the line containing PermitRootLogin prohibit-password
Edit this to reflect PermitRootLogin yes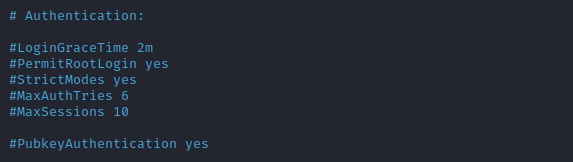
Close and save the file, then reboot or restart sshd service using
/etc/init.d/ssh restart
Set a root password if there isn't one already usingsudo passwd root
Now you can login as root (I recommend using a strong password or SSH keys).Now proceed to sudo up using
sudo suand continue the next steps as root. - Update the Raspberry Pi packages
To update the Raspberry Pi, first ensure the VM you're connecting from over SSH into has an Internet connection and then run the command
apt update && apt upgrade -yOnce the update and upgrade process is complete, pull down the required packages for the next steps using:
apt-get install apt-transport-https zip unzip curl gnupg wget libcap2-bin software-properties-common lsb-release -y
- Install Java 11
echo 'deb http://deb.debian.org/debian stretch-backports main' > /etc/apt/sources.list.d/backports.list
apt update -y
apt install openjdk-11-jdk -y
- Install Elasticsearch OSS
Fetch the Elasticsearch OSS arm64 installation package:
wget https://artifacts.elastic.co/downloads/elasticsearch/elasticsearch-oss-7.10.2-arm64.debInstall the Elasticsearch OSS package:
dpkg -i elasticsearch-oss-7.10.2-arm64.deb - Install Open Distro for Elasticsearch
Download and add the signing keys for the repositories:
wget -qO - https://d3g5vo6xdbdb9a.cloudfront.net/GPG-KEY-opendistroforelasticsearch | sudo apt-key add -wget -qO - https://artifacts.elastic.co/GPG-KEY-elasticsearch | sudo apt-key add -Add the repository definitions:
echo "deb https://d3g5vo6xdbdb9a.cloudfront.net/apt stable main" | sudo tee -a /etc/apt/sources.list.d/opendistroforelasticsearch.listUpdate the packages:
apt-get update -yInstall the Open Distro for Elasticsearch package:
apt install opendistroforelasticsearch -y - Configure and run Elasticsearch
Run the following command to download the configuration file /etc/elasticsearch/elasticsearch.yml:
curl -so /etc/elasticsearch/elasticsearch.yml https://packages.wazuh.com/resources/4.2/open-distro/elasticsearch/7.x/elasticsearch_all_in_one.ymlNow we need to add users and roles in order to use the Wazuh Kibana properly. Run the following commands to add the Wazuh users and additional roles in Kibana:
curl -so /usr/share/elasticsearch/plugins/opendistro_security/securityconfig/roles.yml https://packages.wazuh.com/resources/4.2/open-distro/elasticsearch/roles/roles.yml
curl -so /usr/share/elasticsearch/plugins/opendistro_security/securityconfig/roles_mapping.yml https://packages.wazuh.com/resources/4.2/open-distro/elasticsearch/roles/roles_mapping.yml
curl -so /usr/share/elasticsearch/plugins/opendistro_security/securityconfig/internal_users.yml https://packages.wazuh.com/resources/4.2/open-distro/elasticsearch/roles/internal_users.yml
Remove the demo certificates:
rm /etc/elasticsearch/esnode-key.pem /etc/elasticsearch/esnode.pem /etc/elasticsearch/kirk-key.pem /etc/elasticsearch/kirk.pem /etc/elasticsearch/root-ca.pem -fDownload the wazuh-cert-tool.sh:
curl -so ~/wazuh-cert-tool.sh https://packages.wazuh.com/resources/4.2/open-distro/tools/certificate-utility/wazuh-cert-tool.sh
curl -so ~/instances.yml https://packages.wazuh.com/resources/4.2/open-distro/tools/certificate-utility/instances_aio.yml
Run the wazuh-cert-tool.sh to generate the certificates:
bash ~/wazuh-cert-tool.shMove the Elasticsearch certificates to their corresponding location for deployment:
mkdir /etc/elasticsearch/certs/
mv ~/certs/elasticsearch* /etc/elasticsearch/certs/
mv ~/certs/admin* /etc/elasticsearch/certs/
cp ~/certs/root-ca* /etc/elasticsearch/certs/
Enable and start the Elasticsearch service:
systemctl daemon-reload
systemctl enable elasticsearch
systemctl start elasticsearch
Run the Elasticsearch securityadmin script to load the new certificates information and start the cluster:
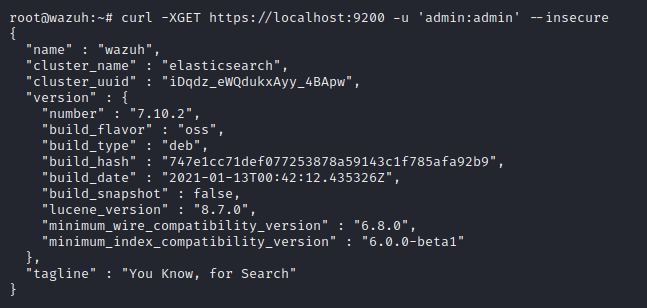
export ES_JAVA_HOME=/usr/share/elasticsearch/jdk/ && /usr/share/elasticsearch/plugins/opendistro_security/tools/securityadmin.sh -cd /usr/share/elasticsearch/plugins/opendistro_security/securityconfig/ -nhnv -cacert /etc/elasticsearch/certs/root-ca.pem -cert /etc/elasticsearch/certs/admin.pem -key /etc/elasticsearch/certs/admin-key.pemRun the following command to ensure the installation is successful:
curl -XGET https://localhost:9200 -u admin:admin -kAn example response should look as follows:
The Open Distro for Elasticsearch performance analyzer plugin is installed by default and can have a negative impact on system resources. The official Wazuh documentation recommends removing this with the following command
/usr/share/elasticsearch/bin/elasticsearch-plugin remove opendistro-performance-analyzerand restarting the Elasticsearch service afterwards.
- Install and run the Wazuh manager
Install the GPG key:
curl -s https://packages.wazuh.com/key/GPG-KEY-WAZUH | apt-key add -Add the repository definition:
echo "deb https://packages.wazuh.com/4.x/apt/ stable main" | tee -a /etc/apt/sources.list.d/wazuh.listUpdate the Wazuh packages:
apt-get update -yInstall the Wazuh manager package:
apt-get install wazuh-managerEnable and start the Wazuh manager service:
systemctl daemon-reload
systemctl enable wazuh-manager
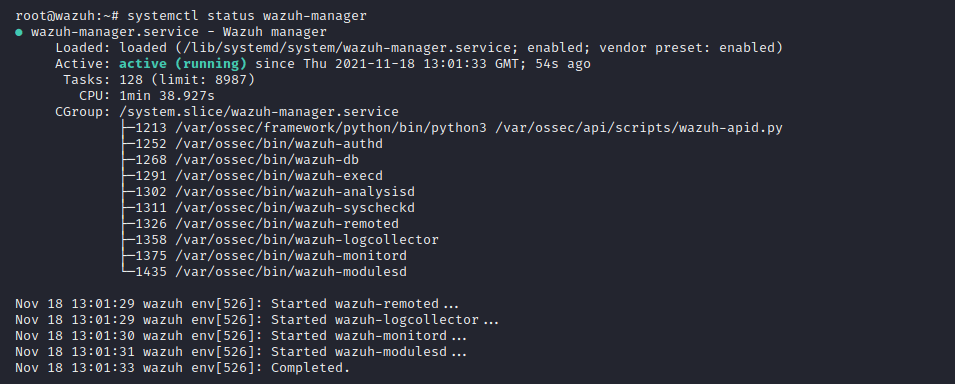
systemctl start wazuh-managerRun the following command to check if the Wazuh manager is active:
systemctl status wazuh-managerAn example response should look as follows:

- Install and configure Filebeat
Add the repository definition:
echo "deb https://artifacts.elastic.co/packages/7.x/apt stable main" | sudo tee -a /etc/apt/sources.list.d/elastic-7.x.listFetch the Filebeat arm64 installation package:
wget https://artifacts.elastic.co/downloads/beats/filebeat/filebeat-oss-7.12.1-arm64.debInstall the Filebeat package:
dpkg -i filebeat-oss-7.12.1-arm64.debDownload the pre-configured Filebeat config file used to forward Wazuh alerts to Elasticsearch:
curl -so /etc/filebeat/filebeat.yml https://packages.wazuh.com/resources/4.2/open-distro/filebeat/7.x/filebeat_all_in_one.ymlDownload the alerts template for Elasticsearch:
curl -so /etc/filebeat/wazuh-template.json https://raw.githubusercontent.com/wazuh/wazuh/4.2/extensions/elasticsearch/7.x/wazuh-template.json
chmod go+r /etc/filebeat/wazuh-template.json
Download the Wazuh module for Filebeat:
curl -s https://packages.wazuh.com/4.x/filebeat/wazuh-filebeat-0.1.tar.gz | tar -xvz -C /usr/share/filebeat/moduleCopy the Elasticsearch certificates into /etc/filebeat/certs:
mkdir /etc/filebeat/certs
cp ~/certs/root-ca.pem /etc/filebeat/certs/
mv ~/certs/filebeat* /etc/filebeat/certs/
Enable and start the Filebeat service:
systemctl daemon-reload
systemctl enable filebeat
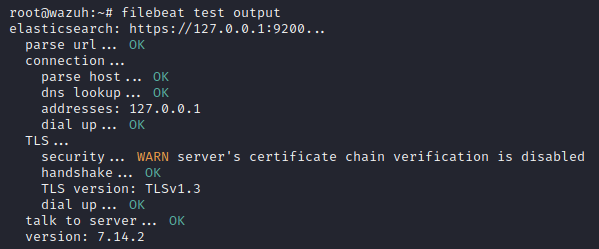
systemctl start filebeatTo ensure that Filebeat has been successfully installed, run the following command:
filebeat test outputAn example response should look as follows:

- Install and configure Kibana
Install the Kibana package:
apt-get install opendistroforelasticsearch-kibanaDownload the Kibana configuration file:
curl -so /etc/kibana/kibana.yml https://packages.wazuh.com/resources/4.2/open-distro/kibana/7.x/kibana_all_in_one.ymlCreate the /usr/share/kibana/data directory:
mkdir /usr/share/kibana/data
chown -R kibana:kibana /usr/share/kibana
Install the Wazuh Kibana plugin. The installation of the plugin must be done from the Kibana home directory as follows:
cd /usr/share/kibana
sudo -u kibana /usr/share/kibana/bin/kibana-plugin install https://packages.wazuh.com/4.x/ui/kibana/wazuh_kibana-4.2.5_7.10.2-1.zip
Copy the Elasticsearch certificates into the Kibana configuration folder:
mkdir /etc/kibana/certs
cp ~/certs/root-ca.pem /etc/kibana/certs/
mv ~/certs/kibana* /etc/kibana/certs/
chown kibana:kibana /etc/kibana/certs/*
Link Kibana’s socket to privileged port 443:
setcap 'cap_net_bind_service=+ep' /usr/share/kibana/node/bin/nodeEnable and start the Kibana service:
systemctl daemon-reload
systemctl enable kibana
systemctl start kibana
Check the Kibana service status to ensure it's running:
systemctl status kibanaAn example response should look as follows:

- Open the Kibana interface
Visit the Raspberry Pi 4B device IP address in your browser (e.g my interface is reachable at https://192.168.1.93). Upon the first access to Kibana, the browser shows a warning message stating that the certificate was not issued by a trusted authority.
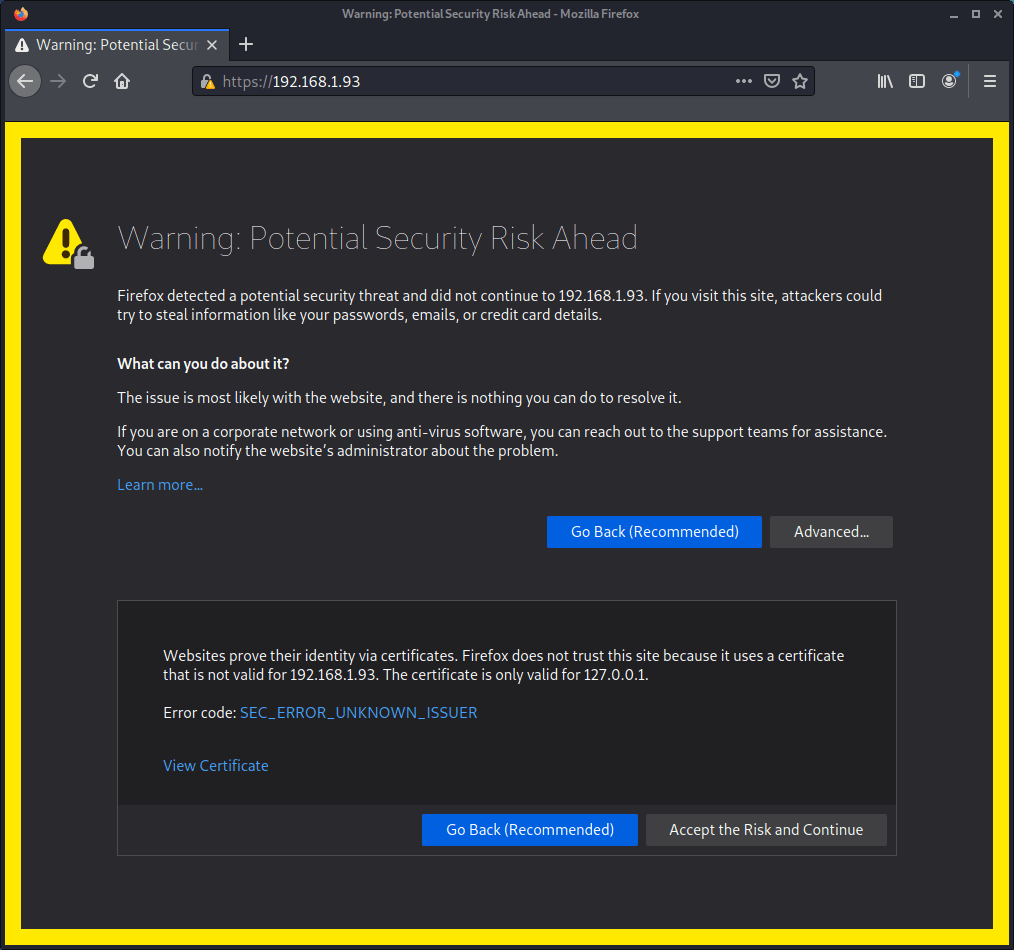
An exception can be added in the advanced options of the web browser or, for increased security, the root-ca.pem file previously generated can be imported to the certificate manager of the browser. Alternatively, a certificate from a trusted authority can be configured.
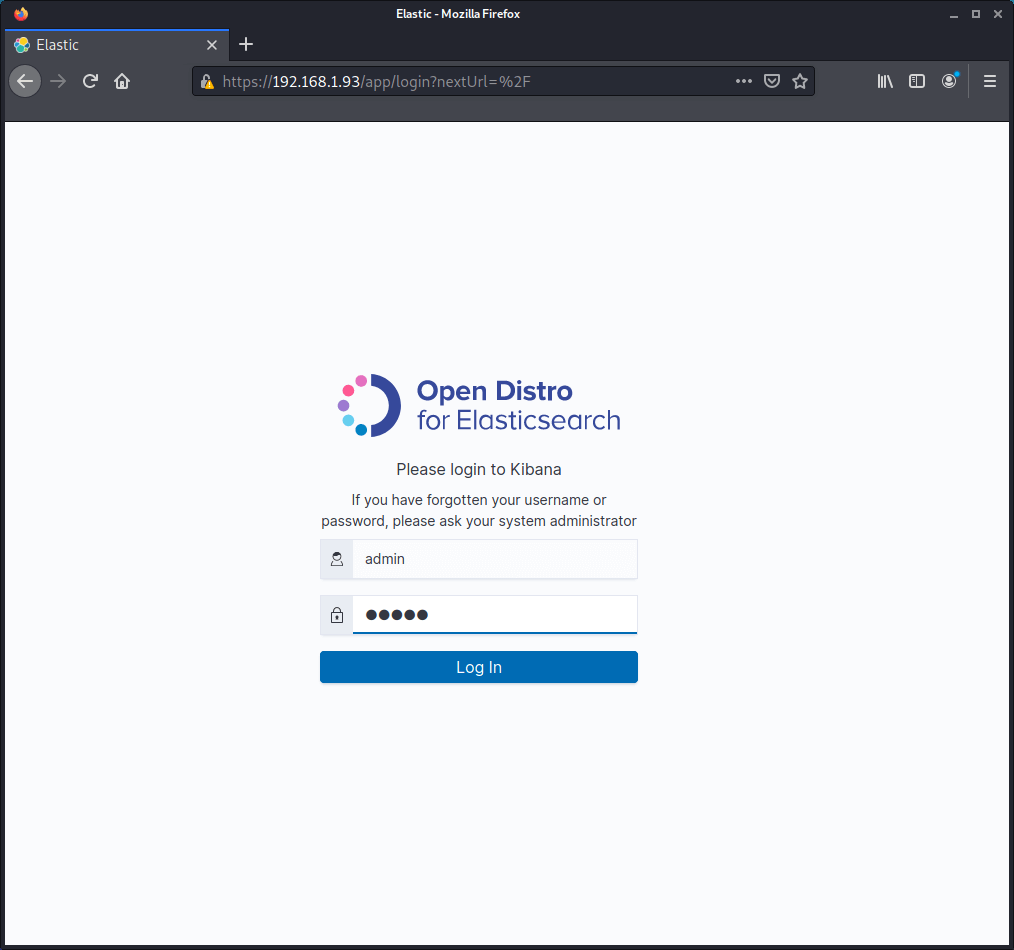
Login to Kibana using the default user credentials admin with the password admin. For security purposes I recommend these credentials are changed.
- Change the default passwords
To change the default credentials for all users residing in the internal_users.yml file, run the following command:
bash wazuh-passwords-tool.sh -aAn example response should look as follows:
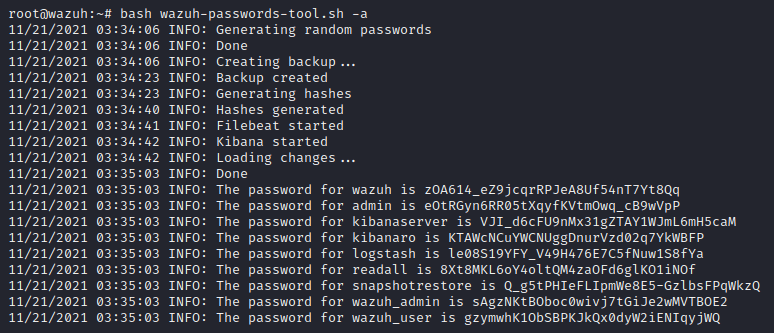
Remember to take note of these credentials or save them into a password manager if you have one.
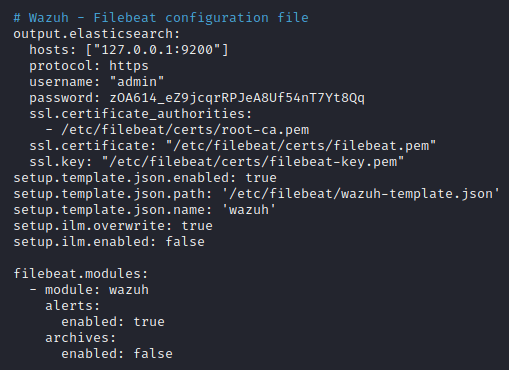
Next we need to also also update the credentials for Filebeat and Kibana (if these were not already covered by the wazuh-passwords-tool.sh script).
Open and update the Filebeat configuration file:
nano /etc/filebeat/filebeat.ymlChange the associated password: value. Make sure you make a record of this, then save and exit.
Open and update the Kibana configuration file:
nano /etc/kibana/kibana.ymlChange the associated elasticsearch.password: value. Make sure you make a record of this, then save and exit.

Restart all services for the changes to take effect:
systemctl restart wazuh-manager
systemctl restart filebeat
systemctl restart kibana
Congratulations, you've now installed the Wazuh server manager onto your Raspberry Pi. Now you can install the Wazuh agents on any devices you want to onboard to monitor security related events from within the server manager interface. The Wazuh agent installation guide is relatively simple and can be found here.
I hope this tutorial helped.